
Crossdesk Relais API
Cross Log API documentation!
About Cross Log API Project
Route Planning:
Route planning involves determining the most efficient paths for delivering packages based on factors such as distance, traffic conditions, delivery time windows, and specific customer requ irements. It aims to optimize delivery routes to minimize costs, reduce delivery time, and improve overall efficiency.
Geolocation and Mapping:
Route planning heavily relies on geolocation and mapping services. These services provide accurate geographical coordinates, street addresses, and mapping functionalities to visualize and calculate routes. Popular mapping services include Google Maps, Mapbox, and OpenStreetMap.
Address Validation and Geocoding:
Before planning a route, it’s essential to validate and geocode the addresses provided by senders and recipients. Address validation ensures that the addresses are correct and complete, while geocoding converts addresses into latitude and longitude coordinates for accurate mapping and route calculations.
Crossdeskmap-framworks
URF-NET:
This framework minimizes the surface area of your ORM technology from disseminating in your application. This framework was deliberately designed to be lightweight, small in footprint size,and non-intimidating to extend and maintain. When we say lightweight we really mean lightweight, when using this framework with the Entity Framework provider there are only 10 classes. This lightweight framework will allow you to elegantly, unobtrusively, and easily patternize your applications and systems with Repository, Unit of Work, and Domain Driven Design. To use Generic Repositories or not? The framework allows the freedom of both, generic repositories and the ability to add in your own domain specific repository methods, in short Unit of Work with extensible and generic Repositories.
URF Features & Benefits
Simplified Data Access:
URF abstracts away the complexities of data access by providing a higher-level API that encapsulates common data operations. It simplifies CRUD operations and eliminates the need to write repetitive data access code, reducing development time and increasing productivity.
Unit of Work Pattern:
URF implements the Unit of Work pattern, which helps manage the transactional behavior and the lifetime of data operations. With the Unit of Work pattern, you can group multiple database operations into a single atomic transaction, ensuring data consistency and integrity.
Repository Pattern:
URF also implements the Repository pattern, which provides a consistent and standardized way of accessing and manipulating data entities. Repositories act as a layer of abstraction between the application and the data source, offering a clean and decoupled approach to data access.
Code Generation:
URF includes a code generation tool that automatically generates repositories and unit of work classes based on your entity models. This saves development time and reduces the chances of errors in manual implementation.
Query Composition:
URF offers powerful query composition capabilities, allowing you to build complex queries using a fluent syntax. It supports various query operations, such as filtering, sorting, paging, and eager loading of related entities.
Supports Multiple Database Providers:
URF is designed to work with different database providers, including SQL Server, MySQL, PostgreSQL, Oracle, and SQLite. It provides flexibility in choosing the database technology that best suits your application requirements.
Integration with Existing Projects:
URF can be easily integrated into existing projects without requiring major architectural changes. It seamlessly integrates with popular frameworks like Entity Framework and Dapper.
Performance Optimization:
URF optimizes data access performance by implementing caching strategies, minimizing database round trips, and providing lazy loading capabilities. This helps improve the overall performance and responsiveness of your application.
Testability:
URF promotes testability by abstracting data access logic into repositories with well-defined interfaces. This allows for easier unit testing of the application’s business logic without the need for actual database connections.
Community and Support:
URF has an active community of developers and provides comprehensive documentation, tutorials, and sample projects. You can find resources and get support from the community to assist you in implementing URF effectively.
Crossdeskmap-api
Installed Packages
1. GeoCoordinate.NetCore V-1.0.0.1
2. Microsoft.AspNet.WebApi.Core V-5.2.9
3. Microsoft.AspNetCore.OpenApi V – 7.0.2
4. Microsoft.Data.SqlClient V – 5.1.0
5. Microsoft.EntityFrameworkCore V – 7.0.0
6. Microsoft.EntityFrameworkCore.SqlServer V – 7.0.0
7. Newtonsoft.Json V – 13.0.2
8. Swashbuckle.AspNetCore V – 6.4.0
Microsoft.AspNet.WebApi.Core
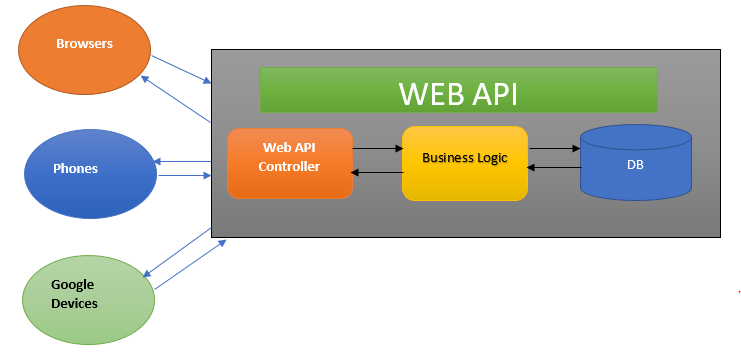
ASP-DOT-NET Web API:
- ASP-DOT-NET Web API is a framework for building HTTP services in .NET. It provides a simple and flexible way to create RESTful APIs that can be consumed by different clients.
- It is a part of the larger ASP-DOT-NET framework and is specifically designed for building HTTP-based services using standard HTTP protocols and conventions.
Version 5.2.9:
- Microsoft.AspNet.WebApi.Core version 5.2.9 is one of the releases in the ASP-DOT-NET Web API 5.2.x series.
- It is an older version and may not include the latest features and enhancements introduced in newer versions.
- Version 5.2.9 is released to provide bug fixes, stability improvements, and compatibility with other components and frameworks used in the ASP-DOT-NET ecosystem.
Key Features and Functionality:
1. Routing and Attribute-based Routing: Web API allows you to define routes and map them to controller actions using conventional routing or attribute-based routing.
2. Content Negotiation: Web API supports content negotiation, allowing clients to request data in various formats (such as JSON or XML) based on their preferences.
3. Model Binding and Validation: You can bind incoming request data to models and perform validation using model validation attributes.
4. Action Filters: Web API provides action filters, which are attributes that can be applied to controller actions to add cross-cutting concerns, such as logging or authentication.
5. HTTP Methods and Status Codes: Web API leverages HTTP methods (GET, POST, PUT, DELETE, etc.) and status codes to represent different operations and responses in a RESTful manner.
Availability and Updates:
1. Microsoft.AspNet.WebApi.Core version 5.2.9 can be obtained through various package management tools like NuGet, which allows you to manage dependencies in your .NET projects.
2. It is important to note that version 5.2.9 might not have the latest features or security patches. It is recommended to check for newer versions and consider updating to a more recent and supported version of ASP-DOT-NET Web API, if possible.
Microsoft.AspNetCore.OpenApi

OpenAPI Specification:
1. The OpenAPI Specification is a specification for defining and documenting RESTful APIs. It provides a standardized way to describe the endpoints, request/response formats, authentication methods, and other details of an API.
2. OpenAPI Specification allows developers to generate interactive documentation, client SDKs, and server stubs based on the API definition.
3. Microsoft.AspNetCore.OpenApi Package:
4. The Microsoft.AspNetCore.OpenApi package is a Microsoft-supported package that enables the generation of OpenAPI/Swagger documentation for ASP-DOT-NET Core Web API projects.
5. It provides middleware and tooling to automatically generate and serve the OpenAPI documentation for your API.
Version 7.0.2:
1. Microsoft.AspNetCore.OpenApi version 7.0.2 is a specific release in the Microsoft.AspNetCore.OpenApi package.
2. It is part of the 7.x.x series and may contain bug fixes, enhancements, and compatibility improvements compared to earlier versions.
Automatic Documentation Generation:
The package automatically generates OpenAPI documentation for your ASP-DOT-NET Core Web API based on the API controllers, actions, request/response models, and attributes.
Swagger UI Integration:
Microsoft.AspNetCore.OpenApi includes Swagger UI, a web-based UI that displays the generated OpenAPI documentation. It provides an interactive interface for exploring and testing the API endpoints.
Customization and Configuration:
The package allows you to customize various aspects of the generated documentation, such as adding descriptions, specifying tags, including XML comments, configuring security definitions, etc.
Versioning Support:
It supports documenting multiple API versions, allowing you to differentiate between different versions of your API in the documentation.
Integration with Swagger Codegen:
Microsoft.AspNetCore.OpenApi integrates with Swagger Codegen, which generates client SDKs in various programming languages based on the OpenAPI definition.
Availability and Updates:
1. Microsoft.AspNetCore.OpenApi version 7.0.2 is available as a NuGet package, which can be easily added to your ASP-DOT-NET Core project using the NuGet Package Manager or by adding a package reference in your project file.
2. It is important to note that newer versions of the package may be available, offering additional features and improvements. It is recommended to consult the official Microsoft documentation or the NuGet package repository for the latest version and any specific release notes.
Microsoft.Data.SqlClient

Compatibility:
Microsoft.Data.SqlClient 5.1.0 is designed to work with Microsoft SQL Server 2012 and higher versions, including Azure SQL Database and Azure SQL Managed Instance.
Enhanced Security:
This version includes improvements in security features, such as support for Azure Active Directory Managed Identity, support for transparent network encryption, and Always Encrypted with secure enclaves.
Performance Improvements:
Microsoft.Data.SqlClient 5.1.0 introduces performance enhancements, including better handling of asynchronous operations, optimizations for high-throughput scenarios, and improved connection pooling behavior.
Azure Integration:
The data provider offers features that are specific to Azure, such as automatic retry logic for transient errors, support for Azure Resource Tokens, and connection resilience for Azure SQL Managed Instance.
Support for .NET Core and .NET Standard:
Microsoft.Data.SqlClient is compatible with .NET Core and .NET Standard, making it cross-platform and allowing developers to build applications on various operating systems, including Windows, Linux, and macOS.
Open-Source Development:
The Microsoft.Data.SqlClient library is developed as an open-source project and is available on GitHub. This allows the community to contribute to its development, report issues, and suggest improvements.
NuGet Package:
To use Microsoft.Data.SqlClient in your .NET application, you can install the NuGet package “Microsoft.Data.SqlClient” version 5.1.0 or higher. This package contains the necessary assemblies and dependencies for connecting to and working with Microsoft SQL Server databases.
Microsoft.EntityFrameworkCore

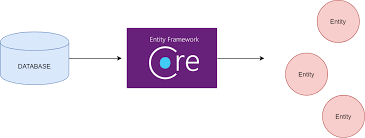
Microsoft.EntityFrameworkCore is an open-source object-relational mapping (ORM) framework developed by Microsoft. It is a part of the larger Entity Framework Core ecosystem and provides a high-level abstraction for working with databases in .NET applications.
Object-Relational Mapping:
Entity Framework Core simplifies the mapping between the application’s object model and the underlying relational database. It eliminates the need to write manual SQL queries by automatically generating database commands based on the application’s domain model.
Cross-Platform Support:
Entity Framework Core is designed to work on multiple platforms, including Windows, Linux, and macOS. This enables developers to build database-driven applications using .NET on their platform of choice.
Database Providers:
Entity Framework Core supports various database providers, including Microsoft SQL Server, SQLite, PostgreSQL, MySQL, and more. This allows developers to target different database systems while using a consistent programming model.
Migrations:
Entity Framework Core includes a built-in migration system that helps manage database schema changes over time. Migrations provide a way to evolve the database schema along with the application, making it easier to version and deploy database changes.
LINQ Integration:
Entity Framework Core seamlessly integrates with Language Integrated Query (LINQ), allowing developers to query and manipulate data using a strongly-typed, object-oriented syntax. LINQ queries are translated into database-specific queries by Entity Framework Core.
Asynchronous Operations:
Entity Framework Core provides support for asynchronous database operations, enabling efficient use of resources and improving application responsiveness. Asynchronous APIs allow developers to perform database queries and updates without blocking the application’s main thread.
Testing and Mocking:
Entity Framework Core supports in-memory database providers, which are useful for writing unit tests without the need for an actual database. Developers can create lightweight, isolated tests that simulate database interactions.
Performance Improvements:
With each release, Entity Framework Core introduces performance enhancements to improve query execution times and reduce memory consumption. Developers can take advantage of these optimizations to build efficient and scalable applications.
Microsoft.EntityFrameworkCore.SqlServer
Microsoft.EntityFrameworkCore.SqlServer is a database provider for Microsoft SQL Server in Entity Framework Core. It allows developers to work with SQL Server databases using Entity Framework Core’s object-relational mapping capabilities.
Some key features and benefits of Microsoft.EntityFrameworkCore.SqlServer include:
Compatibility:
Microsoft.EntityFrameworkCore.SqlServer provides support for various versions of Microsoft SQL Server, including SQL Server 2008 and higher, Azure SQL Database, and Azure SQL Managed Instance.
LINQ Support:
The SQL Server provider allows developers to write LINQ queries against SQL Server databases, providing a strongly-typed and intuitive way to retrieve and manipulate data.
Migrations:
Microsoft.EntityFrameworkCore.SqlServer supports migrations, allowing developers to create, update, and maintain the database schema over time. Migrations simplify the process of evolving the database schema as the application evolves.
Performance Optimizations:
The SQL Server provider includes optimizations to improve query performance, such as generating efficient SQL statements and utilizing SQL Server-specific features.
Transactions and Concurrency:
Microsoft.EntityFrameworkCore.SqlServer provides support for transactions, allowing developers to perform multiple database operations as an atomic unit. It also handles concurrency control to ensure data integrity in multi-user scenarios.
Full-Text Search:
The SQL Server provider offers integration with SQL Server’s full-text search capabilities, enabling developers to perform advanced text-based searches within the database.
Spatial Data:
Microsoft.EntityFrameworkCore.SqlServer supports working with spatial data types, allowing developers to store and query geospatial information within SQL Server databases.
Newtonsoft.Json

Newtonsoft.Json (also known as Json-NET) is a popular open-source library for working with JSON (JavaScript Object Notation) in .NET applications. It provides a powerful set of features for serializing, deserializing, and manipulating JSON data.
JSON Serialization/Deserialization:
Newtonsoft.Json allows you to easily convert .NET objects to JSON and vice versa. It provides flexible options for controlling the serialization and deserialization process, including customizing property names, handling null values, and controlling the formatting of dates and numbers.
LINQ to JSON:
The library includes a LINQ to JSON API, which allows you to query and manipulate JSON data using LINQ syntax. This makes it easy to extract specific data from complex JSON structures and perform various operations on the data.
JSON Schema Support:
Newtonsoft.Json supports JSON Schema, which defines the structure, data types, and validation rules for a JSON document. You can use the library to validate JSON against a schema and generate JSON schemas based on .NET types.
Custom Converters:
The library provides the ability to create custom converters that allow you to customize the serialization and deserialization behavior for specific types. This gives you full control over how your objects are represented in JSON.
Performance and Memory Optimization:
Newtonsoft.Json has a focus on performance and offers options to optimize serialization and deserialization speed. It provides mechanisms to control memory usage, such as using streaming APIs for working with large JSON documents.
Compatibility:
Newtonsoft.Json is compatible with various versions of .NET, including .NET Framework, .NET Core, and .NET Standard. It can be used in a wide range of applications, including web applications, desktop applications, and mobile apps.
Third-Party Integration:
Many popular libraries and frameworks in the .NET ecosystem have built-in support for Newtonsoft.Json. This includes ASP-DOT-NET Web API, Newtonsoft.Json is often the default JSON serializer in these frameworks.
Swashbuckle.AspNetCore

Swashbuckle.AspNetCore version 6.4.0 is an open-source library for ASP-DOT-NET Core that enables the integration of Swagger UI into your API projects. It helps automatically generate interactive documentation for your API based on the OpenAPI Specification (formerly known as Swagger).
Swagger UI Enhancements:
Swashbuckle.AspNetCore 6.4.0 brings improvements to the Swagger UI experience, including a user-friendly interface for exploring and testing API endpoints. It allows users to view and interact with your API documentation easily.
OpenAPI Specification Support:
The library adheres to the OpenAPI Specification, which is a standard for describing RESTful APIs. It leverages the specification to automatically generate accurate and up-to-date documentation for your API endpoints, request/response models, and their respective metadata.
Customization Options:
Swashbuckle.AspNetCore offers extensive customization options to tailor the generated Swagger UI to your specific needs. You can configure details such as the API title, description, version, and contact information. It also provides flexibility to control which endpoints and models are included in the documentation.
Authorization and Authentication Integration:
The library seamlessly integrates with ASP-DOT-NET Core’s authentication and authorization systems. This enables you to include authentication and authorization requirements in your API documentation, providing clear visibility into protected endpoints and their associated policies.
Theming and Styling:
Swashbuckle.AspNetCore 6.4.0 supports customizing the visual appearance of the Swagger UI. You can apply your own CSS styles or choose from a selection of built-in themes to match the UI with your application’s branding and style.
ASP-DOT-NET Core Compatibility:
Swashbuckle.AspNetCore is compatible with various versions of ASP-DOT-NET Core, including ASP-DOT-NET Core 3.x and ASP-DOT-NET Core 5.x. It seamlessly integrates into the ASP-DOT-NET Core middleware pipeline and can be easily added to your project using NuGet packages.
Crossdeskmap-api
Within the .NET Core class library, there is a specific controller named “PickUpPointController.” This controller encapsulates a set of 12 methods that handle various operations and functionalities related to pick-up points.
Methods are below with their descriptions:
- GetPickUpPointByPostalCode
- GetPickUpPointType
- GetServices
- GetShopifyProducts
- GetNearestLocation
- GetAddressFromPoint
- UploadImage
- RemoveImage
- UploadServiceImage
- RemoveServiceImage
- CarrierServiceLabel
- ShopifyAuth
- ShopifyAuthorize
GetPickUpPointByPostalCode:
The “GetLocations” method within the “PickUpPointController” in the .NET Core class library serves the purpose of retrieving service locations based on the latitude and longitude of the user’s shop location. Additionally, it provides the flexibility for the user to modify the limit of records returned and add new services. Furthermore, the method allows for the inclusion or exclusion of location images in the retrieved records, based on the user’s preference.
You can pass below parameters in this end point.
Latitude : string
Longtitude : string
Services : string
allowImage : boolean
limit : int
GetPickUpPointTypeList:
When a user wants to retrieve a list of pick-up point types, they can make an HTTP GET request to the corresponding route, which is “/GetPickUpPointTypeList”. This can be done through a web browser, an API client, or any tool that can send HTTP requests.
Once the user sends the request, the method executes asynchronously, meaning it doesn’t block the application’s execution while waiting for the data. It calls a service called “pickUpPointTypeService” to fetch the list of pick-up point types.
The “pickUpPointTypeService” service is responsible for interacting with the data source, such as a database, to retrieve the pick-up point types. It performs any necessary operations to fetch the data efficiently.
After the list of pick-up point types is retrieved from the service, the method constructs a response indicating that the request was successful by returning an “Ok” result. The retrieved pick-up point type data is included in the response body, allowing the user to see the list of available pick-up point types.
In summary, this method provides a way for users to get a list of pick-up point types by sending an HTTP GET request to the specified route. The method communicates with a service to fetch the data and returns the retrieved list as a response to the user’s request.
GetServices :
To retrieve a list of services, the user can send an HTTP GET request to the corresponding route, which is “/GetServices”. This can be done using a web browser, an API client, or any tool capable of sending HTTP requests.
Upon receiving the request, the method executes asynchronously, meaning it doesn’t block the application’s execution while waiting for the data. It calls a service named “carrierServiceService” to fetch the list of services.
The “carrierServiceService” service is responsible for interacting with a data source, such as a database, to retrieve the desired service information. It performs the necessary operations to efficiently fetch the data.
Once the list of services is retrieved from the service, the method constructs a response indicating that the request was successful by returning an “Ok” result. The retrieved service data is included in the response body, allowing the user to see the list of available services.
In summary, this method provides a way for users to retrieve a list of services by sending an HTTP GET request to the specified route. The method communicates with a service to fetch the data and returns the retrieved list as a response to the user’s request.
GetShopifyProducts:
To retrieve products from the Shopify platform, the user can send an HTTP GET request to the corresponding route, which is “/GetShopifyProducts”. This can be done using a web browser, an API client, or any tool capable of sending HTTP requests.
Upon receiving the request, the method performs the following steps:
It creates a new instance of the HttpClient class, which is used to send HTTP requests.
It creates an HttpRequestMessage object, specifying that it’s an HTTP GET request and providing the URL for the Shopify API endpoint that retrieves product data.
It adds an “X-Shopify-Access-Token” header to the request, which is used for authentication with Shopify. The token allows access to the specific Shopify store associated with the provided access token.
It prepares an empty content body with a content type of “application/json”.
It assigns the prepared content to the request’s Content property.
It sends the prepared request asynchronously using the SendAsync method of the HttpClient instance.
It ensures that the response received from Shopify indicates success by calling EnsureSuccessStatusCode(). If the response is not successful, an exception will be thrown.
It returns an “Ok” result, indicating that the request was successful.
The response content, which contains the retrieved product data in JSON format, is converted to a string using ReadAsStringAsync(). This data is then included in the response body.
GetNearestLocation:
The code snippet represents a method called “GetNearestLocation” within a .NET Core application’s controller. This method is designed to handle an HTTP GET request made by a user.
To find the nearest location based on a search query, the user can send an HTTP GET request to the corresponding route, which includes a parameter for the search query (“/GetNearestLocation/{search}”). This can be done using a web browser, an API client, or any tool capable of sending HTTP requests.
Upon receiving the request, the method performs the following steps:
- It creates a new instance of the
HttpClientclass, which is used to send HTTP requests. - It creates an
HttpRequestMessageobject, specifying that it’s an HTTP GET request and providing the URL for the Virtual Earth REST API endpoint that performs the location search. - It adds an “Authorization” header to the request, which includes a Basic authentication token. The token is used to authenticate with the Virtual Earth API.
- It prepares an empty content body.
- It assigns the prepared content to the request’s
Contentproperty. - It sends the prepared request asynchronously using the
SendAsyncmethod of theHttpClientinstance. - It ensures that the response received from the Virtual Earth API indicates success by calling
EnsureSuccessStatusCode(). If the response is not successful, an exception will be thrown. - It returns an “Ok” result, indicating that the request was successful.
- The response content, which contains the retrieved location data in JSON format, is converted to a string using
ReadAsStringAsync(). This data is then included in the response body.
In summary, this method provides a way for users to find the nearest location based on a search query. It sends an HTTP GET request to the Virtual Earth REST API endpoint, authenticates using the provided Basic authentication token, and returns the retrieved location data as a response to the user’s request.
You can pass below parameter in this end point.
search: string
GetAddressFromPoint:
The code snippet represents a method called “GetAddressFromPoint” within a .NET Core application’s controller. This method is designed to handle an HTTP GET request made by a user and accepts two parameters: “latitude” of type double and “longitude” of type double.
To use this method, you need to include the latitude and longitude values as part of the URL when making the request. For example, if you want to get the address from a specific latitude and longitude, you would send an HTTP GET request to “/GetAddressFromPoint/{latitude}/{longitude}”, replacing “{latitude}” and “{longitude}” with the actual numeric values.
The method then uses these parameters to construct the URL for the Virtual Earth REST API endpoint. The latitude and longitude values are inserted into the URL, and other query parameters are added to specify the desired response format and API key.
Here’s an example of how the URL is constructed using the provided latitude and longitude parameters:
“https://dev.virtualearth.net/REST/v1/Locations/” + latitude + “,” + longitude + “?o=xml&key=”
In this example, the latitude and longitude parameters are inserted into the URL using the “+ latitude +” and “+ longitude +” syntax. The resulting URL includes the specific latitude and longitude values as part of the request to the Virtual Earth API.
The method then proceeds to perform the HTTP request to the Virtual Earth API, including the constructed URL. The response from the API is in XML format, so the method reads the response content as a string and parses it into an XML document using the XmlDocument class.
Finally, the method serializes the XML document into JSON format using JsonConvert.SerializeXmlNode and returns the JSON representation of the address information as the response to the user’s request.
In summary, the “GetAddressFromPoint” method allows users to retrieve the address information based on a specific latitude and longitude. Users can pass the latitude and longitude parameters as part of the URL when making an HTTP GET request to the method. The method constructs the URL for the Virtual Earth API using the provided parameters, retrieves the address information in XML format, converts it to JSON format, and returns it as the response to the user’s request.
You can pass below parameters in this end point.
latitude: string
longtitude: string
UploadImage:
The code snippet represents a method called “UploadImage” within a .NET Core application’s controller. This method is designed to handle an HTTP POST request made by a user to upload an image file. It accepts several parameters, which are explained below:
The method performs the following steps:
- It tries to execute the following code block and handles any exceptions that may occur.
- It assigns a filename for the uploaded image by checking the original filename from the
filesparameter. If it is null, a filename is generated based on the current date and time. - It determines the path where the image file will be stored based on the
isSettingandisHomeparameters. The path is constructed accordingly as “api.crossdeskmap.com/wwwroot/LocationIcons/” for settings, “api.crossdeskmap.com/wwwroot/CustomHomeIcons/” for home page, and “api.crossdeskmap.com/wwwroot/CustomPointerIcons/” for other cases. - If the image is not for a setting, it calls the
UploadImagemethod of thepickUpPointTypeServiceto handle further processing of the image file. - It checks if the uploaded file’s length is greater than 0 to ensure it contains valid data.
- If the target directory for storing the image does not exist, it creates the necessary directory structure using the
_hostingEnvironment.WebRootPathproperty. - It creates a file path using the determined path and filename.
- It creates a
FileStreamto write the uploaded file to the specified file path. - It copies the contents of the uploaded file to the file stream using the
CopyToAsyncmethod. - If the upload process is successful, it returns an “Ok” result with the uploaded filename as the response.
- If an exception occurs during the upload process, it returns an “Ok” result with the exception details as the response.
In summary, the “UploadImage” method allows users to upload an image file through an HTTP POST request. The method processes the uploaded file, determines the storage path based on the provided parameters, and saves the file to the appropriate location. It also calls a service method for further processing, if necessary. The method handles exceptions and returns a response indicating the success or failure of the upload process.
files(type:IFormFile?): Represents the uploaded image file. It is annotated with the[FromForm]attribute, indicating that the value should be extracted from the form data in the HTTP request.
isSetting(type:bool): Specifies whether the image is being uploaded for a setting. It is used to determine the path where the image file will be stored.
isHome(type:bool): Specifies whether the image is being uploaded for the home page. It is used to determine the path where the image file will be stored.
ImageId(type:Guid?, optional): Represents an optional parameter that specifies the ID of the image. If provided, it is used during the image upload process.
RemoveImage
The method performs the following steps:
- It tries to execute the following code block and handles any exceptions that may occur.
- It assigns a path where the image file is stored. The path is set to “api.crossdeskmap.com/wwwroot/CustomIcons/”.
- It checks if the image file exists at the specified path using the combination of, the determined path, and the provided
imageName. - If the image file exists, it deletes the file using the
System.IO.File.Deletemethod, passing the full file path as an argument. - If an exception occurs during the file removal process, it throws the exception.
- If the file removal process is successful or no file exists with the specified name, it returns an “Ok” result to indicate the successful completion of the method.
imageName(type:string): Represents the name of the image file to be removed.
In summary, the “RemoveImage” method allows users to remove/delete an image file by providing the name of the file as a parameter. The method checks if the file exists at the specified path and deletes it if it is found. It handles exceptions and returns an “Ok” result to indicate the success of the operation
UploadServiceImage
The code snippet represents a method called “UploadServiceImage” within a .NET Core application’s controller. This method is designed to handle an HTTP POST request made by a user to upload an image file for a service. It accepts the following parameters.
The method performs the following steps:
- It tries to execute the following code block and handles any exceptions that may occur.
- It assigns a filename for the uploaded image by checking the original filename from the
filesparameter. If it is null, a filename is generated based on the current date and time. - It determines the path where the image file will be stored, set to “api.crossdeskmap.com/wwwroot/ServiceIcons/”.
- It calls the
UploadImagemethod of thecarrierServiceServiceto handle further processing of the image file. The service method is responsible for storing additional information related to the image. - It checks if the uploaded file’s length is greater than 0 to ensure it contains valid data.
- If the target directory for storing the image does not exist, it creates the necessary directory structure using the
_hostingEnvironment.WebRootPathproperty and the determined path. - It creates a
FileStreamto write the uploaded file to the specified file path. - It copies the contents of the uploaded file to the file stream using the
CopyToAsyncmethod. - If the upload process is successful, it returns an “Ok” result with the uploaded filename as the response.
- If an exception occurs during the upload process, it returns an “Ok” result with the exception details as the response.
Parameters:
files(type:IFormFile?): Represents the uploaded image file. It is annotated with the[FromForm]attribute, indicating that the value should be extracted from the form data in the HTTP request.ImageId(type:Guid?, optional): Represents an optional parameter that specifies the ID of the image. If provided, it is used during the image upload process.
In summary, the “UploadServiceImage” method allows users to upload an image file for a service through an HTTP POST request. The method processes the uploaded file, determines the storage path, and saves the file to the appropriate location. It also calls a service method for further processing and storage of additional information related to the image. The method handles exceptions and returns a response indicating the success or failure of the upload process.
RemoveServiceImage
The code snippet represents a method called “RemoveServiceImage” within a .NET Core application’s controller. This method is designed to handle an HTTP POST request made by a user to remove/delete an image file associated with a service. It accepts the following parameters
imageName(type:string): Represents the name of the image file to be removed.
ImageId(type:Guid?, optional): Represents an optional parameter that specifies the ID of the image. If provided, it is used during the removal process.
The method performs the following steps
- It tries to execute the following code block and handles any exceptions that may occur.
- It assigns the path where the image file is stored, set to “api.crossdeskmap.com/wwwroot/ServiceIcons/”.
- It calls the
UploadImagemethod of thecarrierServiceServicewith an empty string and the providedImageIdparameter. This method may handle any necessary operations related to the removal of the image. - It checks if the image file exists at the specified path using the combination of
_hostingEnvironment.WebRootPath, the determined path, and the providedimageName. - If the image file exists, it deletes the file using the
System.IO.File.Deletemethod, passing the full file path as an argument. - If an exception occurs during the file removal process, it throws the exception.
- If the file removal process is successful or no file exists with the specified name, it returns an “Ok” result to indicate the successful completion of the method.
In summary, the “RemoveServiceImage” method allows users to remove/delete an image file associated with a service by providing the name of the file as a parameter. The method checks if the file exists at the specified path and deletes it if it is found. It may also perform additional operations related to the removal of the image. The method handles exceptions and returns an “Ok” result to indicate the success of the operation.
CarrierServiceLabel
The code snippet represents a method called “Label” within a .NET Core application’s controller. This method is designed to handle an HTTP GET request made by a user to retrieve a list of carrier service labels. It uses the [HttpGet] attribute to indicate that this method is triggered by an HTTP GET request with the specified route “CarrierServiceLabel”.
The method performs the following steps:
- It asynchronously calls the
GetLabelListmethod of thecarrierServiceServiceto retrieve the list of carrier service labels. - The
awaitkeyword is used to wait for the completion of the asynchronous operation, ensuring that the data is retrieved before proceeding. - The retrieved data is stored in the
datavariable. - It returns an “Ok” result with the retrieved data as the response. The
Okmethod indicates that the operation was successful, and the data is serialized and returned to the user.
In summary, the “Label” method allows users to retrieve a list of carrier service labels through an HTTP GET request. It calls the GetLabelList method, which is responsible for fetching the data, and returns the retrieved data as a response. The method is decorated with the [HttpGet] attribute, indicating that it specifically handles GET requests for the “CarrierServiceLabel” route.
ShopifyAuth:
The method performs the following steps:
- It retrieves the user’s store URL from the query parameters of the request using
Request.Query["shop"].ToString(). The value is stored in theusersMyShopifyUrlvariable. - It defines the
redirectUrl, which is the URL that Shopify will redirect the user to after they’ve confirmed app installation. This URL should be specified in your app’s settings in the Shopify app dashboard. - It creates a list of
AuthorizationScopeobjects representing the Shopify access scopes that your application requires to run. In this example, the scopes include “ReadCustomers”, “WriteCustomers”, and “WriteContent”. You can customize this list based on your app’s requirements. - It retrieves the Shopify API key, which is necessary for authentication.
- The
AuthorizationService.BuildAuthorizationUrlmethod is called with the specified parameters (scopes, user’s store URL, API key, and redirect URL) to build the authorization URL for Shopify authentication. - The generated authorization URL is stored in the
authUrlvariable. - The method returns an “Ok” result with the generated authorization URL as the response. The URL represents the authentication URL that the user needs to visit to initiate the Shopify authentication process.
In summary, the “ShopifyAuth” method generates an authorization URL for Shopify authentication based on the provided parameters. It retrieves the user’s store URL, specifies the necessary scopes, and builds the authorization URL using the Shopify API key and redirect URL. The method returns the generated authorization URL as the response, which the user can visit to authenticate their Shopify store with the application.
ShopifyAuthorize:
The provided code snippet represents a method called “ShopifyAuthorize” within a .NET Core application’s controller. This method handles an HTTP GET request made by Shopify after the user has authorized the application’s installation. The method is decorated with the [HttpGet] attribute and the route “ShopifyAuthorize” to indicate that it handles GET requests to that specific endpoint.
Here’s an explanation of the method’s functionality:
- The method retrieves the query parameters from the incoming request using
Request.Query["parameterName"].ToString(). It specifically retrieves the values of “code” and “shop” query parameters. The “code” parameter represents the authorization code, and the “shop” parameter contains the user’s store URL. These values are stored in thecodeandmyShopifyUrlvariables, respectively. - The method defines the Shopify API key and secret key, which are necessary for token exchange and authentication. These values are stored in the
shopifyApiKeyandshopifySecretKeyvariables. - The
AuthorizationService.Authorizemethod is called with the provided parameters (authorization code, user’s store URL, API key, and secret key) to exchange the authorization code for an access token. This method internally performs the necessary token exchange and authentication with Shopify. The returned access token is stored in theaccessTokenvariable. - The
shopifyAccountsService.Addmethod is called to store the user’s Shopify store URL and access token. This method likely saves this information for later use within your application. - The method redirects the user to a specified URL using the
Redirectmethod. In this example, the URL “http://localhost:3011?embedded=1” is used for the redirection.
Overall, the “ShopifyAuthorize” method handles the Shopify authorization process. It retrieves the authorization code and user’s store URL, exchanges the code for an access token, saves the access token, and redirects the user to a designated URL.
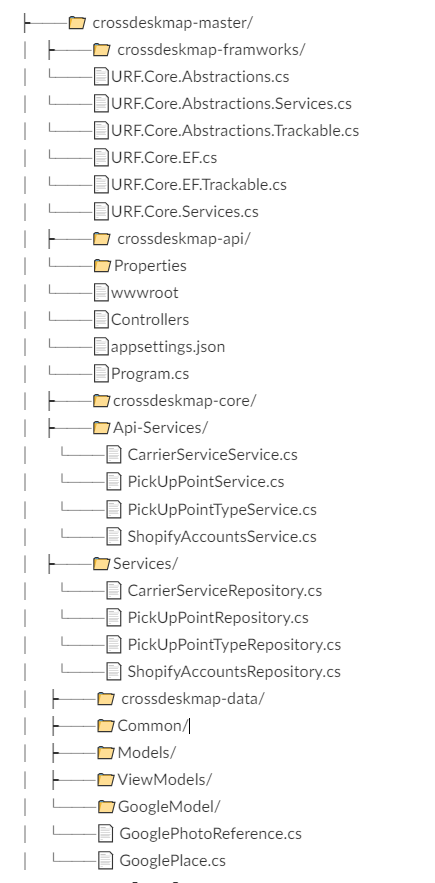
Application Flow
Folder Structure
crossdeskmap-core
Services:
Services are below with their descriptions.
CarrierServiceService Class
ITrackableRepository<CarrierService> carrierServicerepo;- This declaration represents a repository interface named, which is used to access and manage data related to carrier services.
public CarrierServiceService(ITrackableRepository<CarrierService> repository)- This is the constructor of the
CarrierServiceServiceclass. It receives an instance ofITrackableRepository<CarrierService>and assigns it to thecarrierServicerepofield.
List<string> Errors { get; init; } = new List<string>();- This property represents a list of error messages. It is used to store any errors that occur during the processing of user operations. The
initaccessor allows setting the property value only during object initialization. The property is initialized with an empty list.
bool Successful => Errors.Count == 0;- This property indicates the success of an operation. It returns
trueif there are no errors in theErrorslist, indicating a successful execution of user operations.
public async Task<List<CarrierService>> GetLabelList()- This method retrieves a list of carrier services ordered by the
Labelproperty. It utilizes thecarrierServicereporepository to query the data and returns the result as a list ofCarrierServiceobjects.
public async Task<List<IGrouping<Guid, CarrierService>>> GetServiceList()- This method retrieves a list of carrier services from a SQL Server database using a raw SQL query. It establishes a connection to the database, executes the query, and maps the returned data to a list of
CarrierServiceobjects. Then, it groups the list based on theCarrierIdproperty and returns the grouped data as a list ofIGrouping<Guid, CarrierService>.
public async Task UploadImage(string ImageName, Guid id)- This method is responsible for updating the
LogoNameproperty of a carrier service identified by the givenid. It establishes a connection to the database and executes an SQL update query to set theLogoNamecolumn of theCarrierServicetable. TheImageNameparameter specifies the new value for theLogoNamecolumn.
In summary, this .NET BLL code provides functionality related to carrier services for users. It includes methods to retrieve a list of carrier services, group them by carrier ID, and update the logo name of a specific carrier service. The Errors property and Successful property are used to handle and indicate the success or failure of operations performed by users.
PickUpPointService Class
The code you provided represents a .NET Business Logic Layer (BLL) class named PickUpPointService. Let’s go through the code and explain its functionality:
Class Declaration and Dependencies:
- The class
PickUpPointServiceis declared and implements theIGenericServiceinterface. - It inherits from
EntityFrameworkRepositoryBase, indicating that it uses Entity Framework as the underlying data access technology. - The class has two dependencies injected through the constructor:
unitOfWork: An instance of theIUnitOfWorkinterface, which represents a unit of work for managing transactions and database operations.pickUpPointRepo: An instance of theITrackableRepository<PickUpPoint>interface, which provides access to the repository for managingPickUpPointentities.
Interface Implementation:
- The class implements the
IGenericServiceinterface, which requires the implementation of two properties:Errors: A list of error messages.Successful: A boolean value indicating the success status of the operation.
- The class implements the
ReadAllAsync Method:
- This method retrieves a list of
PickUpPointentities based on certain criteria. - It accepts parameters such as latitude, longitude, limit, an optional array of service IDs, and a filter for advanced querying.
- Inside the method, there are commented sections representing examples of other database operations such as reading, deleting, updating, and inserting records.
- The method performs a query on the
pickUpPointRepoto retrieve the relevantPickUpPointentities. - If
servicesparameter is provided, it filters the results based on service IDs. - The retrieved data is ordered based on the proximity to the provided latitude and longitude.
- The method groups the results by the
Nameproperty and returns a list ofIGrouping<string, PickUpPoint>.
- This method retrieves a list of
Additional Database Queries:
- The method also executes additional database queries to retrieve related data.
- It queries the “PickupPointType” and “CarrierService” tables to retrieve
PickupPointTypeandCarrierServiceentities respectively. - The retrieved data is used to populate the corresponding properties (
PickupPointTypeandcarrierService) of eachPickUpPointentity.
Reset Method:
- This method is a recursive helper method called within the
ReadAllAsyncmethod. - It is used to fetch additional
PickUpPointentities if the initial query result is insufficient to meet the specified limit. - The method skips a certain number of records and retrieves the next batch of entities.
- It recursively calls itself until the desired limit is reached or there are no more entities to retrieve.
- This method is a recursive helper method called within the
Overall, the PickUpPointService class provides functionalities for retrieving PickUpPoint entities with optional filtering, grouping, and related data retrieval. It demonstrates usage of the Entity Framework for data access and implements the IGenericService interface for error handling and success status tracking.
PickUpPointTypeService Class
The PickUpPointTypeService class is a part of the Business Logic Layer (BLL) in a .NET application. It inherits from EntityFrameworkRepositoryBase and implements the IGenericService interface. Its purpose is to handle operations related to the PickupPointType entities.
Constructor:
The class constructor accepts two parameters: IUnitOfWork and ITrackableRepository<PickupPointType>. These dependencies are injected into the class through constructor injection, providing access to a unit of work and a repository for PickupPointType entities.
Interface Implementation:
The class implements the IGenericService interface, which defines properties for managing errors and determining the success of operations.
Errors: This property is a list of error messages that may occur during the execution of the operations. It is initialized as an empty list.Successful: This property indicates whether the operations were successful. It evaluates totrueif theErrorslist is empty, meaning no errors occurred.
GetList Method:
The GetList method retrieves a list of PickupPointType entities from a database. It establishes a connection to the database using the provided connection string. Then, it executes a SQL SELECT query to fetch all records from the PickupPointType table. The retrieved data is mapped to a list of PickupPointType objects, which are created based on the data read from the database. Finally, the method closes the database connection and returns the list of PickupPointType entities.
UploadImage Method:
The UploadImage method updates the LogoName property of a specific PickupPointType entity identified by the provided id. It takes an ImageName parameter, representing the new logo name to be assigned to the entity.
First, the method uses the injected pickUpPointRepo (repository) to retrieve the PickupPointType entity corresponding to the given id. Then, it assigns the new ImageName to the LogoName property of the entity.
Next, it establishes a connection to the database using the provided connection string. It executes an SQL UPDATE query to update the LogoName column in the PickupPointType table for the specified PickupPointTypeId. The update is performed by setting the LogoName to the new ImageName value.
If any exceptions occur during the execution of the method, they are caught, and the exception is re-thrown to be handled at a higher level.
Summary
The PickUpPointTypeService class serves as the Business Logic Layer (BLL) for the PickupPointType entities. It provides methods to retrieve a list of entities from the database and update the LogoName property of a specific entity. The class follows dependency injection principles, utilizing a unit of work and a repository for data access. By implementing the IGenericService interface, it exposes properties for managing errors and determining the success of operations.
ShopifyAccountsService Class
Class Declaration and Dependencies:
- The
ShopifyAccountsServiceclass is declared and inherits from theEntityFrameworkRepositoryBaseclass, suggesting the usage of Entity Framework for data access. - The class has two dependencies injected through its constructor:
unitOfWork: An instance of theIUnitOfWorkinterface, which represents a unit of work for managing transactions and database operations.repository: An instance of theITrackableRepository<ShopifyAccounts>interface, which provides access to the repository responsible for managingShopifyAccountsentities.
Add Method:
- The
Addmethod is responsible for inserting a newShopifyAccountsentity into the database. - It accepts two parameters:
shopandtoken, which represent the shop and token values to be stored in the database, respectively. - The method performs an
INSERToperation using a SQL query. - It establishes a connection to the database using the provided connection string.
- Inside a
usingstatement, aSqlCommandobject is created with theINSERTquery and the connection. - The method sets the parameter values (
@Shopand@Token) to the provided values. - After opening the connection, the
ExecuteNonQuerymethod is called to execute theINSERTquery, inserting the new record into theShopifyAccountstable. - Finally, the connection is closed.
Overall, the ShopifyAccountsService class provides a method (Add) that allows adding new records to the ShopifyAccounts table in the database. It uses Entity Framework as the data access technology and executes an INSERT query to store the provided shop and token values.
Repositories:
Repositories are below with their descriptions.
CarrierServiceRepository Class
Class Declaration and Dependency:
- The
CarrierServiceRepositoryclass is declared and inherits from theEntityFrameworkRepositoryBaseclass, indicating the use of Entity Framework for data access. - The class has a dependency injected through its constructor:
repository: An instance of theITrackableRepository<CarrierService>interface, which provides access to the repository responsible for managingCarrierServiceentities.
GetLabelList Method:
- The
GetLabelListmethod retrieves a list of labels associated with carrier services. - It returns a list of strings representing the labels.
- Inside the method, there is a call to the
GetLabelListmethod without any parameters, which could lead to an infinite recursive loop and should be corrected.
Repository Purpose:
- The purpose of the
CarrierServiceRepositoryis to provide data access and operations specific to theCarrierServiceentity. - It abstracts away the underlying data access implementation details, allowing the consumers of this repository to interact with the
CarrierServiceentity without being concerned with the specific data access technology used (in this case, Entity Framework).
Overall, the CarrierServiceRepository class serves as a repository for performing data access operations related to the CarrierService entity. It encapsulates the logic for retrieving a list of labels associated with carrier services. However, please note that the existing implementation of the GetLabelList method contains a potential issue with recursive calling and should be corrected to ensure proper functionality.
PickUpPointRepository Class
Class Declaration and Dependency:
- The
PickUpPointRepositoryclass is declared and inherits from theEntityFrameworkRepositoryBaseclass, indicating the use of Entity Framework for data access. - The class has a dependency injected through its constructor:
repository: An instance of theITrackableRepository<PickUpPoint>interface, which provides access to the repository responsible for managingPickUpPointentities.
ReadAllAsync Method:
- The
ReadAllAsyncmethod is responsible for retrieving allPickUpPointentities based on a provided filter. - It accepts a parameter called
filter, which is of typeIQueryAllFilter<Expression<Func<PickUpPoint, bool>>>. This filter allows users to define custom criteria for querying thePickUpPointentities. - Inside the method, there is a call to the
ReadAllAsyncmethod, passing theQueryableproperty of therepositoryas the data source and the providedfilter. - The method returns an
IQueryAllResponse<PickUpPoint>object, which represents the response containing the list of retrievedPickUpPointentities.
Repository Purpose:
- The purpose of the
PickUpPointRepositoryis to provide data access and operations specific to thePickUpPointentity. - It acts as an intermediary between the consuming code and the underlying data storage (in this case, an Entity Framework repository).
- The repository abstracts away the details of the data access implementation and allows users to interact with
PickUpPointentities without being concerned about the specific data access technology used.
Overall, the PickUpPointRepository class serves as a repository for performing data access operations related to the PickUpPoint entity. It provides a method, ReadAllAsync, for retrieving all PickUpPoint entities based on a specified filter. By utilizing this repository, users can easily query and retrieve PickUpPoint entities without dealing with the complexities of the underlying data access technology.
PickUpPointTypeRepository Class
Class Declaration and Dependency:
- The
PickUpPointTypeRepositoryclass is declared and inherits from theEntityFrameworkRepositoryBaseclass, indicating the use of Entity Framework for data access. - The class has a dependency injected through its constructor:
repository: An instance of theITrackableRepository<PickupPointType>interface, which provides access to the repository responsible for managingPickupPointTypeentities.
GetList Method:
- The
GetListmethod is responsible for retrieving a list of allPickupPointTypeentities. - It doesn’t accept any parameters.
- Inside the method, there is a call to the
GetListmethod, which is not provided in the given code snippet. It’s likely that this is a placeholder for a method that retrieves the list ofPickupPointTypeentities from the repository. - The method returns an
IQueryAllResponse<PickupPointType>object, which represents the response containing the list of retrievedPickupPointTypeentities.
Repository Purpose:
- The purpose of the
PickUpPointTypeRepositoryis to provide data access and operations specific to thePickupPointTypeentity. - It acts as an intermediary between the consuming code and the underlying data storage (in this case, an Entity Framework repository).
- The repository abstracts away the details of the data access implementation and allows users to interact with
PickupPointTypeentities without being concerned about the specific data access technology used.
Overall, the PickUpPointTypeRepository class serves as a repository for performing data access operations related to the PickupPointType entity. It provides a method, GetList, for retrieving a list of all PickupPointType entities. By utilizing this repository, users can easily retrieve the desired PickupPointType entities without dealing with the complexities of the underlying data access technology.
ShopifyAccountsService Class
Class Declaration and Dependencies:
- The
ShopifyAccountsServiceclass inherits from theEntityFrameworkRepositoryBaseclass, indicating that it uses Entity Framework for data access. - The class has two dependencies injected through its constructor:
unitOfWork: An instance of theIUnitOfWorkinterface, which represents a unit of work for managing transactions and database operations.repository: An instance of theITrackableRepository<ShopifyAccounts>interface, which provides access to the repository responsible for managingShopifyAccountsentities.
Add Method:
- The
Addmethod is responsible for adding a newShopifyAccountsentity to the database. - It accepts two parameters:
shop(representing the shop value) andtoken(representing the token value). - Inside the method, there is a connection string that specifies the necessary information to connect to the database.
- The method then defines an SQL INSERT query with parameters, specifying the table name and column names to insert the provided values.
- It creates a new SQL connection (
SqlConnection) using the connection string and a new SQL command (SqlCommand) using the query and connection. - The method adds the parameter values for the shop and token to the command’s parameters collection.
- It opens the connection, executes the INSERT query using
ExecuteNonQuery(which doesn’t return any results), and then closes the connection.
Repository Purpose:
- The purpose of the
ShopifyAccountsServiceclass is to provide a service layer that interacts with theShopifyAccountsentity. - It utilizes the
repositorydependency to access the underlying data storage and perform data access operations. - The
Addmethod allows users to add a newShopifyAccountsentity to the database by executing an SQL INSERT query.
Overall, the ShopifyAccountsService class serves as a service layer for managing ShopifyAccounts entities. It provides an Add method that facilitates adding new ShopifyAccounts records to the database using SQL queries. By utilizing this service, users can easily add new Shopify accounts to the system without dealing with the intricacies of the data access layer or SQL statements.
crossdeskmap-data
Common Folder:
The “Common” folder in your application is a central location that houses classes, interfaces, and utility functions that are shared and used throughout the entire application. It serves as a repository for code components that are commonly used across different parts of the application.
The purpose of the “Common” folder is to promote code reusability, maintainability, and consistency across the application. It contains classes and modules that provide generic functionalities or shared resources that can be utilized by multiple components or modules within the application.
Here’s an overview of the types of classes and files you may find within the “Common” folder:
Constants and Enums:
These classes or files store constant values or enumerations that are utilized throughout the application. They define specific values or options that are used consistently across different modules.
Utility Classes:
Utility classes provide helper methods or functions that can be reused across various parts of the application. These classes contain commonly used operations such as string manipulation, date and time handling, file management, or mathematical calculations. They encapsulate frequently needed functionalities in a reusable manner.
Custom Exceptions:
Custom exception classes define specific types of exceptions that can be thrown and caught within the application. These exceptions are designed to handle and communicate specific error conditions or exceptional situations in a more structured and meaningful way.
Interfaces:
Interfaces within the “Common” folder define common contracts or behaviors that can be implemented by different classes or modules. They establish a common set of methods or properties that components can adhere to, enabling them to be used interchangeably. Interfaces promote modularity and allow for loose coupling between components.
Extension Methods:
Extension methods are utility methods that extend the functionality of existing types or classes without modifying their original implementation. These methods allow you to add new behaviors or functionalities to existing types, making it easier to enhance or customize the functionality of classes without modifying their original code.
By organizing these common functionalities within the “Common” folder, developers can leverage existing code components to simplify their development tasks. They can reuse shared functionalities, avoid duplicating code across different parts of the application, and ensure consistency in the implementation of common operations. The “Common” folder facilitates more efficient development and easier maintenance of the application as a whole.
Models Folder:
The “.NET Model” folder within your application serves as a container for classes that represent the data model or business entities used in your application. It is a structured and organized location where you define the structure, properties, and behaviors of your application’s data objects.
The purpose of the “.NET Model” folder is to encapsulate the data-related logic, define the structure of data entities, and establish relationships between them. It is primarily responsible for representing the real-world concepts or business entities within your application domain.
Here’s an overview of the types of classes you may find within the “.NET Model” folder:
Entity Classes:
These classes represent the fundamental data entities in your application. They typically map to database tables or other external data sources. Each entity class corresponds to a specific concept or entity in your application domain, such as a user, customer, product, order, or any other relevant business entity. Entity classes define the properties and behaviors associated with those entities.
Data Transfer Objects (DTOs):
DTOs are classes that define the structure and properties of objects used for transferring data between different layers or components of your application. They serve as a communication mechanism to transport data without exposing the underlying complexities of the domain model. DTOs are often used to optimize data transfer and reduce coupling between different layers.
Validation and Data Annotation Classes:
These classes provide validation rules and constraints for the data entities. They define attributes or annotations that specify validation criteria for properties, such as required fields, length restrictions, data format validations, and more. These annotations enable automatic validation of data when interacting with the model.
Enums:
Enumerations are used to define a set of named constants, representing a specific domain or a collection of related values. Enums help in enforcing a limited set of valid values for certain properties or fields within the model. They provide a way to represent discrete options or choices that can be assigned to properties of an entity.
Model Interfaces:
Model interfaces define contracts or common behaviors that model classes can implement. These interfaces establish a common set of methods or properties that classes should adhere to, ensuring consistency and providing a way to interact with different types of entities through a shared interface.
By organizing these model-related classes within the “.NET Model” folder, developers can have a clear and structured representation of their application’s data entities. The folder provides a centralized location to manage and maintain the data model, making it easier to understand and work with the application’s domain concepts. It also promotes modularity, reusability, and separation of concerns by separating data-related logic from other parts of the application.